Deploy a ready-made Notion-like wiki (React + Firebase + Tiptap)
This wiki is fully open source. The source code, build scripts and Firestore rules live on GitHub at github.com/fleweg/flexweg-notion — clone it, fork it, contribute to it, or just read the code to understand how everything fits together.
This tutorial walks you through deploying a fully functional Notion-like document editor — nested pages, rich block editor, mentions, file uploads, public publishing — on Flexweg, for free, using Firebase as the backend.
You don't write any code. The project is open source and ready to ship — clone it, plug in your own Firebase keys, run the build, upload the result to Flexweg. The whole thing takes about 15 minutes.
The lesson is the same as the Kanban use case: static hosting doesn't mean static content. Flexweg serves plain HTML/JS, but the page reads from and writes to a real database (Firestore), authenticates real users (Firebase Auth), tracks who visits which page in real time, and even publishes selected pages as static HTML back to your own Flexweg site for public sharing.
What you'll get
- A Notion-like editor with nested pages in a sidebar tree, drag-to-reorder, page icons (emoji) and per-user favorites.
- A Tiptap-based block editor with a slash menu for headings, lists, to-do, tables, callouts, toggles, code blocks, page links, user @-mentions, image / file uploads to Flexweg, and YouTube embeds.
- Real-time multi-user updates — when a teammate edits or visits a page, you see it within seconds, with a "Last edited by X" indicator at the top of the document.
- Email + password authentication with two roles (admin, member) and a profile (first name / last name) that drives mentions and viewer history.
- Per-page sharing controls — keep a page open to the whole workspace, or restrict it to specific members.
- One-click publishing to a static HTML version uploaded to your Flexweg site — anyone with the link can read it, no sign-in required.
- A live URL on Flexweg that you can hand out to your team.
- Total cost: 0 € under the free tiers of Flexweg and Firebase.
The project is open source: github.com/fleweg/notion.
Why this works on a static host
The page itself is React + Vite + Tiptap, compiled at build time into a folder of static files. Flexweg serves those files. Once the page loads in the visitor's browser, the JavaScript talks directly to Firebase over HTTPS — no Flexweg backend involved.
- Authentication: Firebase Auth is a JS SDK that handles sign-in entirely on the client.
- Database: Firestore exposes a JS SDK with security rules enforced server-side, so even though the API key is shipped in the bundle (it has to be — it's a publishable key by design), unauthorized reads/writes are rejected.
- Real-time:
onSnapshotopens a WebSocket-like connection to Firestore directly from the browser, so a remote edit propagates to every open tab within a second. - Image / file uploads go through Flexweg's Files API — no Firebase Storage required (which would force you onto the paid Blaze plan).
- Page publishing writes a self-contained HTML file back to your Flexweg site through the same Files API.
This is the BaaS pattern — but applied to a wiki / knowledge-base app where the same browser doubles as the editor and as the publisher.
Prerequisites
- The common setup from the Prerequisites page (Docker or Node, Git, GitHub if you want to fork, a free Flexweg account).
- A Google account (any Gmail address works) to sign in to Firebase and create a project.
- A Flexweg API key with write access to your site — needed so the app can upload images, files and the optional published HTML. The first-run setup walks you through generating one.
Step 1 — Clone the project
git clone https://github.com/fleweg/notion.git
cd notion
This is a stock React + Vite app. The repository has no secrets in it — every value sensitive to your project lives in the .env file (or in the in-app setup form, see Step 4 (option B)).
Step 2 — Set up your Firebase project
This app needs a Firebase project (Firestore database, email/password authentication, a registered web app). The setup is identical for any Firebase-backed Flexweg site, so it lives on its own page:
Open the Firebase setup guide, follow Steps 1 to 19, then come back here.
When you're done, you'll have:
- A Firebase project with Firestore in production mode
- Email/password authentication enabled
- A bootstrap admin account (its email will go into your
.env) - The 6 Firebase web app config values (api key, project ID, etc.)
Once you've completed the shared setup, leave the Firebase console open on the Firestore Database page — you need it for the next step.
Step 3 — Apply the Notion Firestore security rules
The shared setup left your Firestore database without any project-specific rules. The Notion-like wiki needs the rules below to enforce auth, per-page sharing, viewer tracking and admin-only Flexweg credentials.
In the Firebase console, go to Firestore Database → Rules, paste the ruleset below, and click Publish.
Replace [email protected] with the same email you used as the bootstrap admin (Step 18 of the Firebase setup).
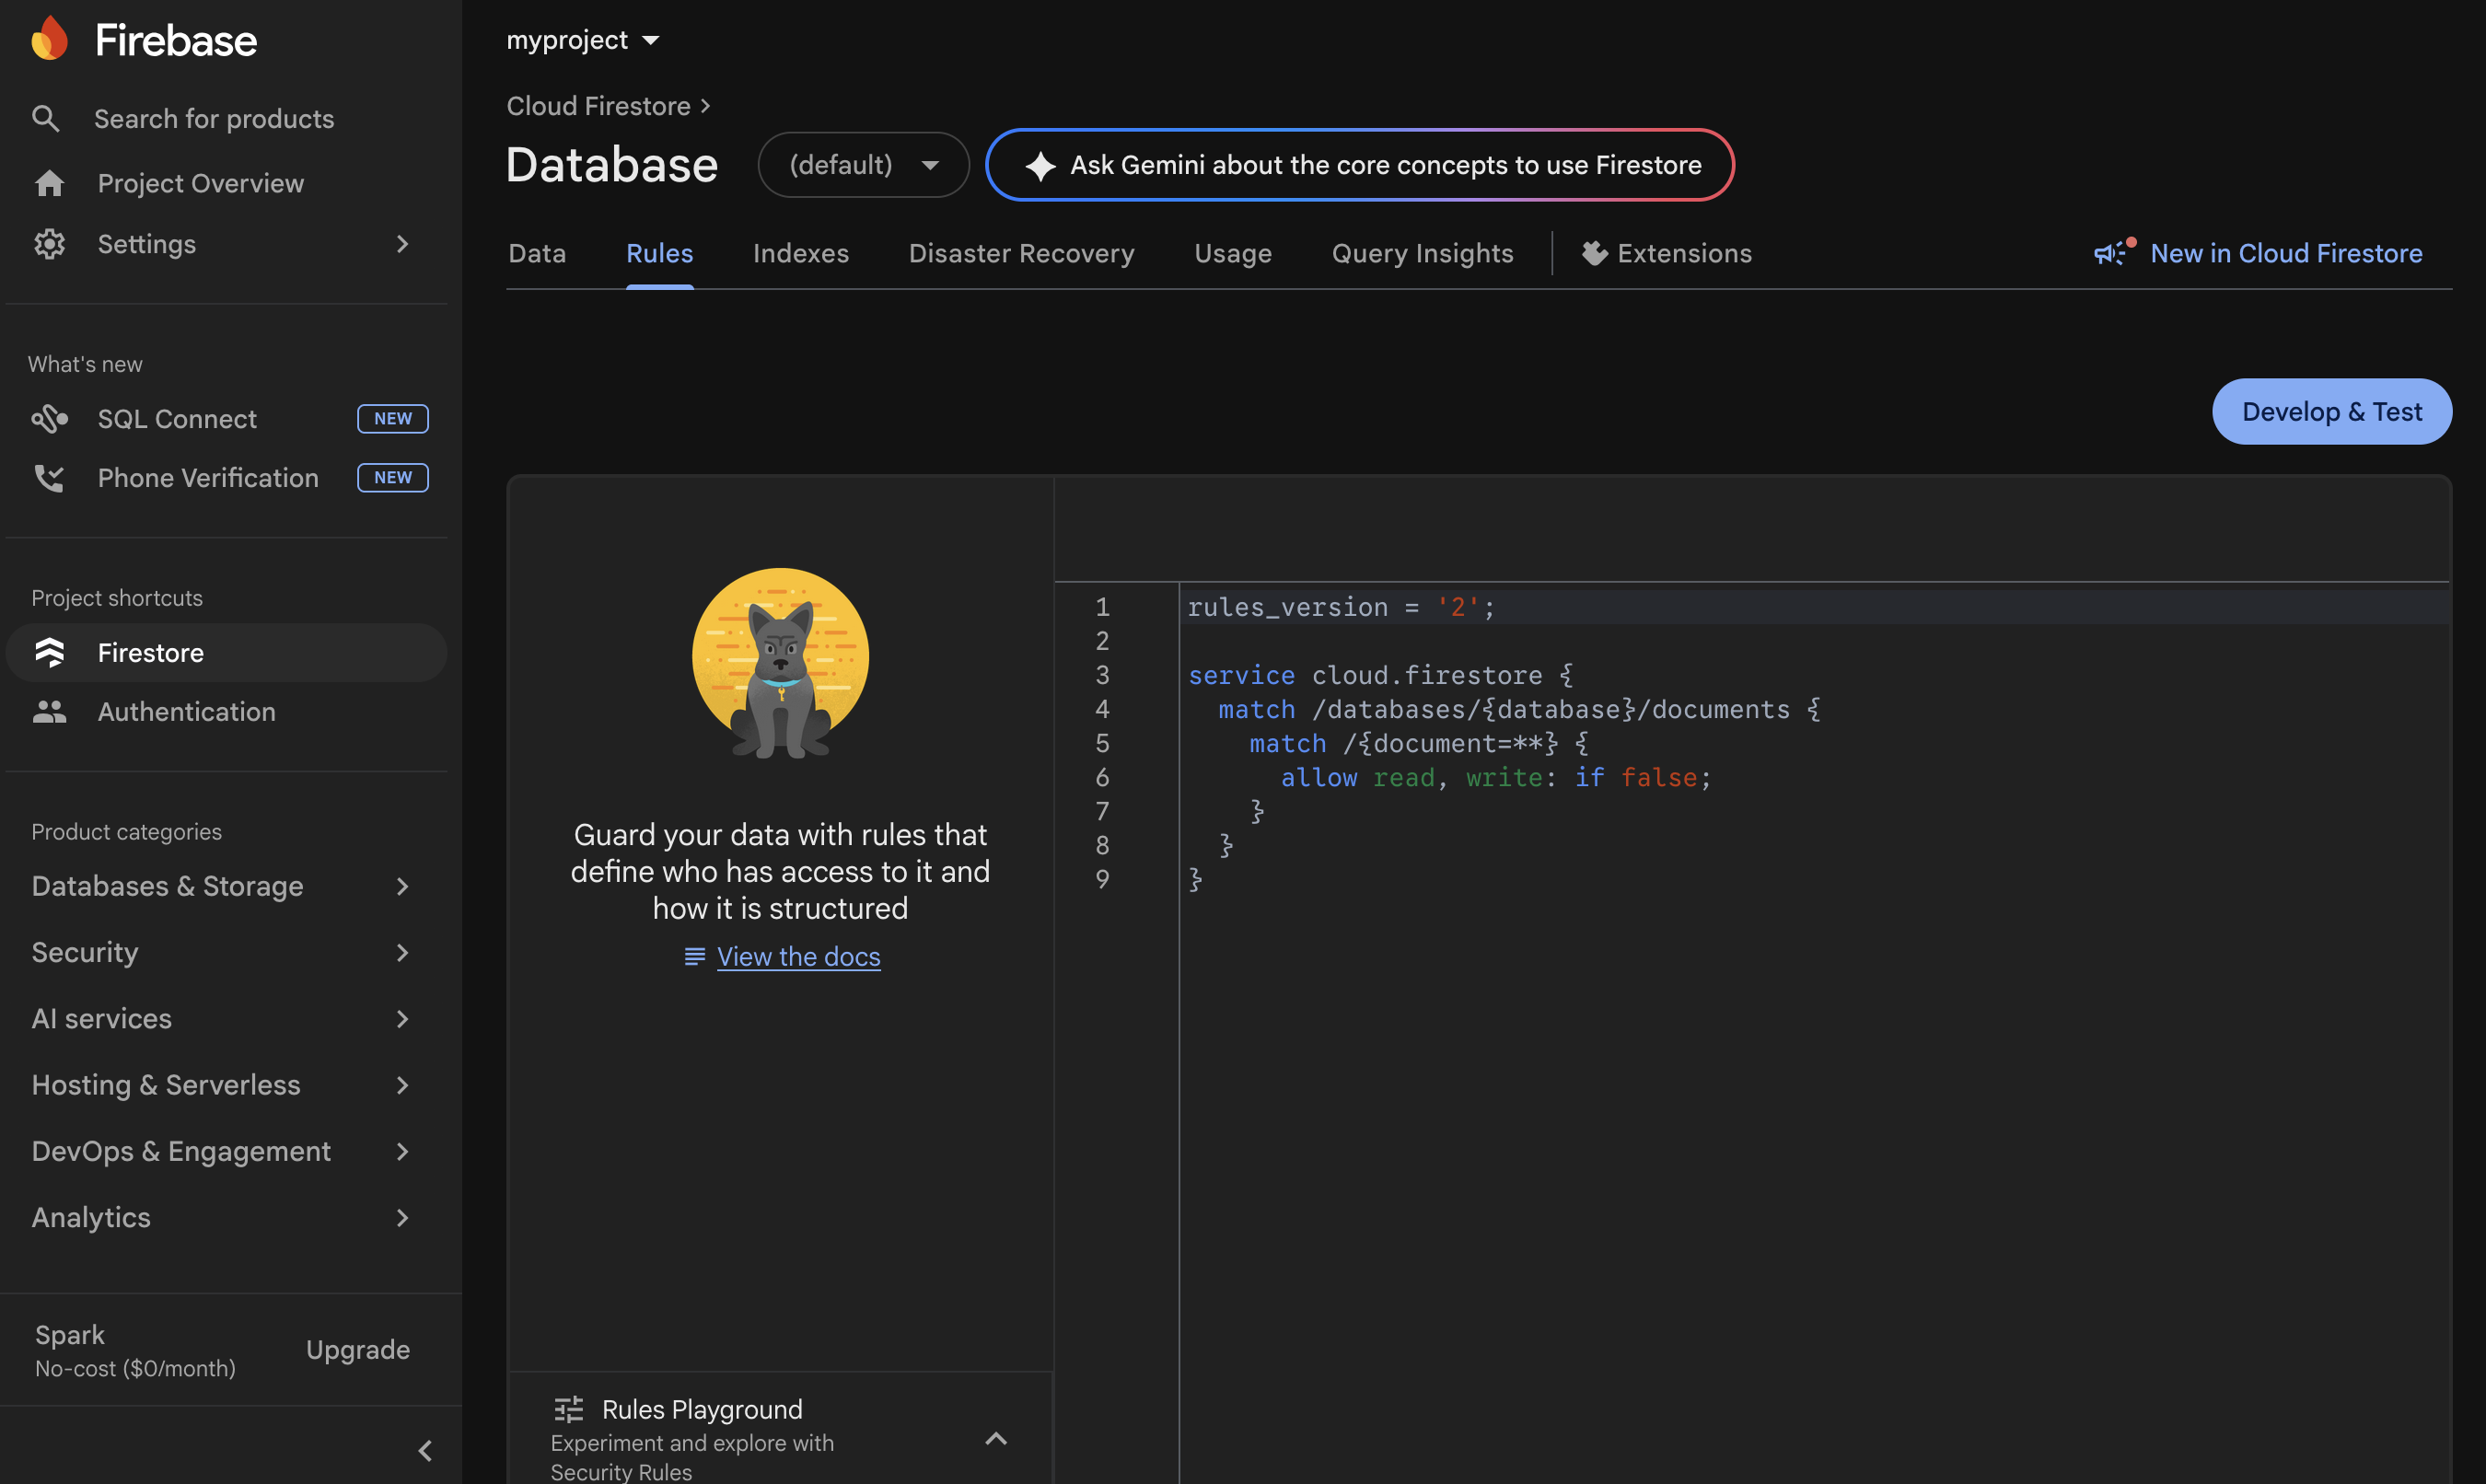
rules_version = '2';
service cloud.firestore {
match /databases/{database}/documents {
function signedIn() { return request.auth != null; }
function userDoc() {
return get(/databases/$(database)/documents/users/$(request.auth.uid)).data;
}
function isBootstrapAdmin() {
}
function hasUserDoc() {
return signedIn() && exists(/databases/$(database)/documents/users/$(request.auth.uid));
}
function isActiveUser() {
return isBootstrapAdmin() || (hasUserDoc() && userDoc().disabled != true);
}
function isAdmin() {
return isBootstrapAdmin() || (hasUserDoc() && userDoc().role == "admin" && userDoc().disabled != true);
}
match /pages/{pageId} {
// List is open to every active user — the sidebar filters
// restricted pages client-side. `get` enforces the sharing model
// so a direct URL to a restricted page is rejected unless the
// viewer is the owner or in `sharedWith`.
allow list: if isActiveUser();
allow get: if isActiveUser() && (
resource.data.sharingMode != "restricted" ||
resource.data.createdBy == request.auth.uid ||
request.auth.uid in resource.data.sharedWith
);
allow create: if isActiveUser();
allow update, delete: if isActiveUser();
match /viewers/{uid} {
// Each user writes their own viewer record on page open.
allow read: if isActiveUser();
allow write: if signedIn() && request.auth.uid == uid;
}
}
match /users/{uid} {
allow get: if signedIn() && (request.auth.uid == uid || isActiveUser());
allow list: if isActiveUser();
allow create: if signedIn()
&& request.auth.uid == uid
&& request.resource.data.role == "user"
&& request.resource.data.disabled == false;
// Self-edit for profile/favorites, admin-edit for role/disabled.
allow update: if (signedIn() && request.auth.uid == uid) || isAdmin();
allow delete: if isAdmin();
}
match /config/{id} {
// Flexweg credentials and other shared settings: readable by any
// active user (the editor needs them to upload images), writable
// only by admins.
allow read: if isActiveUser();
allow write: if isAdmin();
}
}
}
What these rules say in plain English:
- Nothing is readable while signed out — visitors who aren't authenticated see nothing in Firestore.
- Disabled accounts are blocked at the database level, not just hidden in the UI.
- Restricted pages are invisible to non-members — even if a teammate shares the in-app URL, Firestore refuses the read.
- Members can edit their own profile and favorites; only admins can promote, demote, disable or remove a teammate.
- Flexweg API credentials are admin-write-only — members can read them (they need to upload images) but can't change them.
The project's README has the same setup written as prose — useful if you want to cross-check anything.
Step 4 — Configure the app
The Notion-like wiki supports two ways to provide its Firebase + Flexweg credentials. Pick whichever fits your workflow.
- A. .env at build time (developer)
- B. In-app setup form (no-code)
In the cloned project, copy the example file and fill in the values from your Firebase setup (the 6 web-app config values + the admin email):
cp .env.example .env
Open .env in your editor and replace each value:
# Copy this file to .env and fill in your Firebase project credentials.
# Find these values in Firebase Console > Project settings > General > Your apps > SDK setup and configuration.
VITE_FIREBASE_API_KEY=AIzaSy...
VITE_FIREBASE_AUTH_DOMAIN=your-project.firebaseapp.com
VITE_FIREBASE_PROJECT_ID=your-project
VITE_FIREBASE_STORAGE_BUCKET=your-project.appspot.com
VITE_FIREBASE_MESSAGING_SENDER_ID=1234567890
VITE_FIREBASE_APP_ID=1:1234567890:web:abcdef
# Email of the bootstrap administrator. This account is treated as admin
# without needing a record in the `users` Firestore collection. The same
# value MUST be referenced in your Firestore security rules.
Vite bakes those values into the bundle when you run the build, so the deployed app boots straight to the sign-in page — no in-app setup form.
Vite inlines every VITE_* variable into the JavaScript bundle at build time. That's intentional — the Firebase SDK needs them on the client. They are designed to be public; Firebase's security rules enforce who can read or write what, not the API key. Don't put true secrets (like a Stripe sk_live_… key) into a Vite app.
If you'd rather not edit a .env file, leave it empty and the app will show a first-run setup wizard the first time the deployed site is opened. The wizard collects:
- Welcome — primer on what the app does and what Firebase is for.
- Terms — the project's terms of use (free service, your data stays yours, fair use, etc.). You must check the acceptance box to continue.
- Firebase — the 6 web-app config values + the bootstrap admin email + password. The wizard signs in to validate the values before moving on.
- Flexweg — your Flexweg API key + site URL. The wizard tests the key, writes
config/flexwegto Firestore, and uploads a populatedconfig.jsfile back to Flexweg.
After the wizard completes, every browser that opens the deployed URL boots straight to the sign-in screen — the populated config.js is loaded synchronously before the main bundle, so the wizard never shows again.
Open Flexweg → Account → API, generate a permanent key, and keep it handy for the wizard's last step. The key is stored in your Firestore config/flexweg document so only signed-in members can read it; no one outside your team can use it to upload to your site.
Step 5 — Build the static site
Run the build to produce the dist/ folder. Pick whichever stack you have on hand.
- With Node.js (npm)
- With Docker
npm install --legacy-peer-deps
npm run build
npm run preview
The --legacy-peer-deps flag is required once, while TypeScript 6 and react-i18next resolve a peer-dependency mismatch. The preview server prints something like:
> [email protected] preview
> vite preview

  ➜  Local:   http://localhost:4173/
  ➜  Network: use --host to expose
Open the URL Vite shows you (here http://localhost:4173/) — if you used the .env path you'll land on the sign-in screen; if you skipped .env you'll get the first-run wizard.
# Install dependencies (one-shot, legacy-peer-deps required)
docker run --rm -v "$(pwd):/app" -w /app node:20-alpine \
  npm install --legacy-peer-deps

# Build the static site
docker run --rm -v "$(pwd):/app" -w /app node:20-alpine npm run build

# Preview the build locally
docker run --rm -p 4173:4173 -v "$(pwd):/app" -w /app node:20-alpine \
  npm run preview -- --host 0.0.0.0
Open http://localhost:4173/ — if you used the .env path you'll land on the sign-in screen; if you skipped .env you'll get the first-run wizard.
The build produced a folder called dist/ at the project root. Inside, you'll find:
dist/
├── index.html
├── config.js
├── assets/
│   ├── index-abc123.js
│   ├── index-def456.css
│   └── ...
└── favicon.svg
That's a complete, self-contained static site — exactly what Flexweg needs. The config.js file is loaded synchronously before the JS bundle: it ships empty (window.__FLEXWEG_CONFIG__ = null) and gets overwritten by the in-app setup wizard once the user finishes it, or is simply ignored when .env was filled at build time.
Step 6 — Upload to Flexweg
- Log into your Flexweg account and open your site.
- Upload the contents of
dist/(not the folder itself) to the root of your Flexweg site:- Open
dist/on your machine, select all files and folders inside it. - In Flexweg's file explorer, drag and drop them at the root of your site (where
index.htmlshould live).
- Open
- Wait for the upload to complete.
Open your Flexweg URL (e.g. https://etzdkz9x.flexweg.com/).
- If you took the
.envroute, you'll see the sign-in screen — log in with your admin email and password. - If you took the in-app setup form route, you'll see the four-step wizard. After step 4 the page reloads automatically and you land on the sign-in screen.
What happens on first sign-in
You don't need to create any collections, tables or fields by hand. The first time the admin signs in, the app creates the necessary collections automatically as you start using it:
pages— populated each time you create a page in the sidebar tree.pages/{id}/viewers— populated each time someone opens that page (one document per viewer, with a view counter and a last-viewed timestamp).users— populated as new accounts sign in for the first time. Self-served profile fields (first name, last name) and per-user favorites are stored here.config/flexweg— written by the setup wizard if you used the no-code path, or by Settings → Flexweg if you used the.envpath. Holds the Flexweg API key the editor uses for image / file uploads and page publishing.
To see the data appear in real time, open another tab on console.firebase.google.com, pick your project, and go to Firestore Database → Data. As you click around in the app, the corresponding documents and collections show up. You can inspect, edit or delete entries directly from this view if needed.
Once the site works, set up the Deploy from Git workflow so every push to your fork rebuilds and redeploys automatically. Set BUILD_DIR=dist in the workflow.
A tour of the editor
Once you sign in, you're handed an empty workspace. Here's the path from blank slate to a useful wiki.
- Create a page — click the
+next to "Pages" in the sidebar. Give it a title and an icon (any emoji from the picker). - Type
/to open the slash menu — you'll see Notion-like options: headings, lists, to-do, tables, callouts (info/success/warning/error variants with editable emoji), collapsible toggles, code blocks, dividers. - Insert a link to another page with
/page-link— opens a fuzzy-search picker over the workspace. The link auto-updates if the target page's title or icon changes. - Mention a teammate with
@— picks from the active members list. The chip shows their first/last name from Settings → Profile, or their email as a fallback. - Drop an image anywhere in the editor — it uploads to Flexweg under
pages/{pageId}/...and inserts an<img>automatically. Files (PDF, text, fonts) are supported via/fileand rendered as a download card. - Drag pages around the sidebar — three drop zones per row (before / inside / after) let you reorganize the tree. Pages with descendants move as a subtree; cycles are rejected automatically.
- Open the document top bar — left side is a breadcrumb up to the root, right side has Viewers (who opened the page and when), Share, Favorite, and a "..." menu (Duplicate, Copy link, Move to trash).
Sharing & publishing
The Share button opens a modal with two independent capabilities:
- Visibility within the workspace — "All members" (default, every signed-in user can read) or "Restricted" (only the owner + a checked list of members). The Firestore rules from Step 3 enforce the restriction server-side so a direct URL doesn't bypass it.
- Publish to web — only the page owner can toggle this. When enabled, the editor walks the page's content tree, renders it to a self-contained HTML file (inline CSS, no JS), and uploads it to Flexweg at
published/{pageId}/index.html. The resulting URL (https://<your-site>/published/<pageId>/) requires no authentication and is meant to be shared externally.
After every subsequent edit, a "stale" badge appears in the modal so the owner knows to click Republish if they want the public version refreshed.
Free-tier limits
The free tier of Firebase (Spark plan) covers most small-team use cases:
| Resource | Free tier |
|---|---|
| Firestore reads | 50,000 / day / database |
| Firestore writes | 20,000 / day / database |
| Firestore deletes | 20,000 / day / database |
| Stored data | 1 GB |
For a wiki with a few dozen users editing pages, you'll likely never hit any of these. Image and file uploads don't count — they live on Flexweg, not Firebase.
If you outgrow the free tier, the pay-as-you-go Blaze plan is dramatically cheaper than running your own database:
- ~$0.06 per 100k reads
- ~$0.18 per 100k writes
- Storage at $0.18 / GB / month
- Scales automatically without any infrastructure work on your side
A team that does 1 million page edits per month pays ~$2 — for a fully managed, replicated, real-time database. No SQL server to provision, patch or back up.
Going further
- Customize the look — fork the repo, edit the Tailwind classes in
src/, redeploy. The Tiptap extensions live undersrc/components/editor/extensions/if you want to add your own block types. - Invite teammates — sign in as admin, open the
/memberspage, ask each new user to log in once (the bootstrap creates theirusersdocument automatically), then promote them to admin from the same page if needed. - Tweak the published HTML look — the inline CSS lives at the bottom of
src/services/publish.ts(PUBLISHED_CSS). Edit, rebuild, redeploy. - Plug Firebase into your own project — the same pattern works for any data-driven static app: blog comments, internal admin tools, dashboards, multiplayer apps. See Connect to external databases for other BaaS options.
Recap
You now have:
- A real, static-hosted wiki / knowledge-base app with a Notion-style block editor.
- An auth-gated, role-based, real-time database backed by Firebase.
- Per-page sharing controls + one-click publishing to a static HTML version on your own Flexweg site.
- Total monthly hosting cost: €0 for personal and small-team use.
Combined with the Kanban use case, you've now seen the same Firebase + Flexweg stack power two very different production-grade apps — a ticket manager and a wiki — without ever provisioning a server.